Overview
An agent is a reusable workflow the super agent builds from a successful chat session. Instead of re-prompting the same task every time, you save it as an agent you can run again with different inputs.Creating an agent
Run a successful session
Use the chat to accomplish a task — generate a report, build an HTML page, analyze data, or anything else.
Click Create Agent
When you’re happy with the result, click the Create Agent button in the chat input bar. The super agent analyzes the session and extracts the workflow.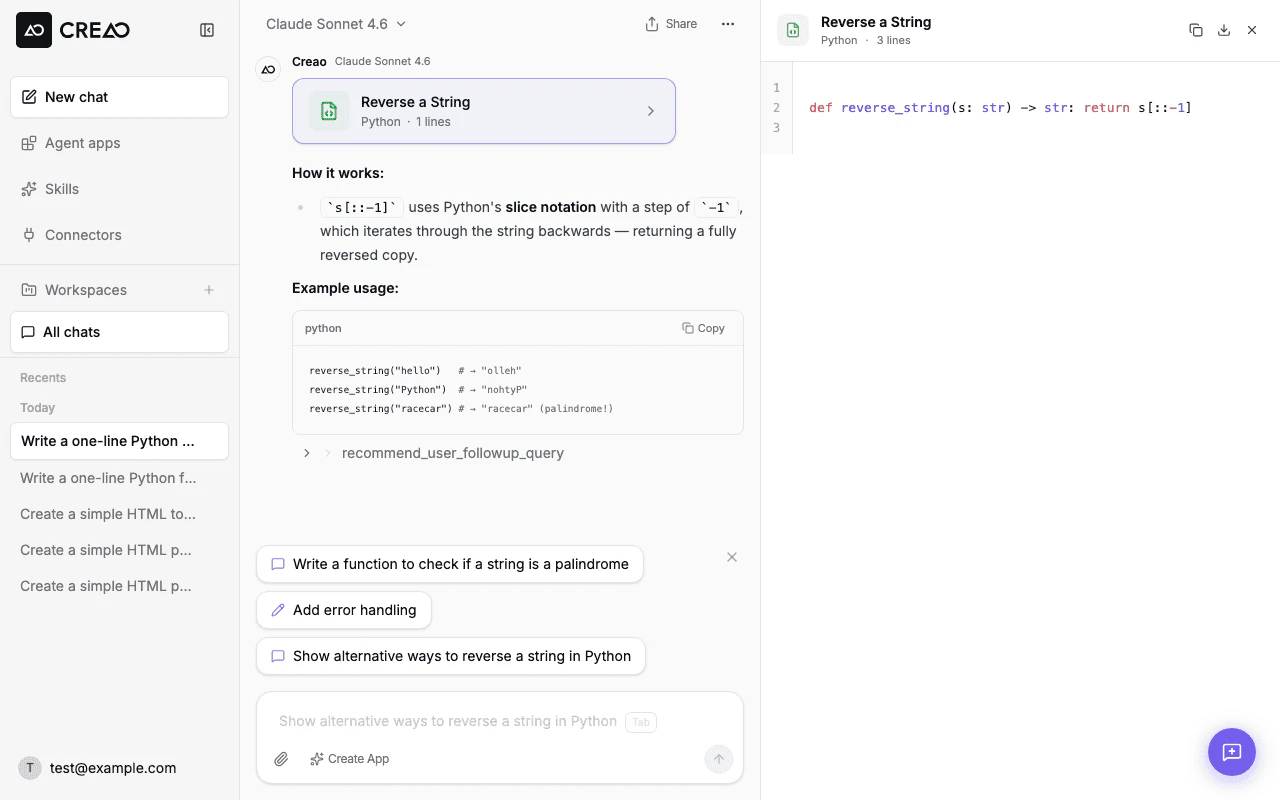
Configure the agent
A dialog appears where you can set the output format and provide optional instructions for how the agent should behave: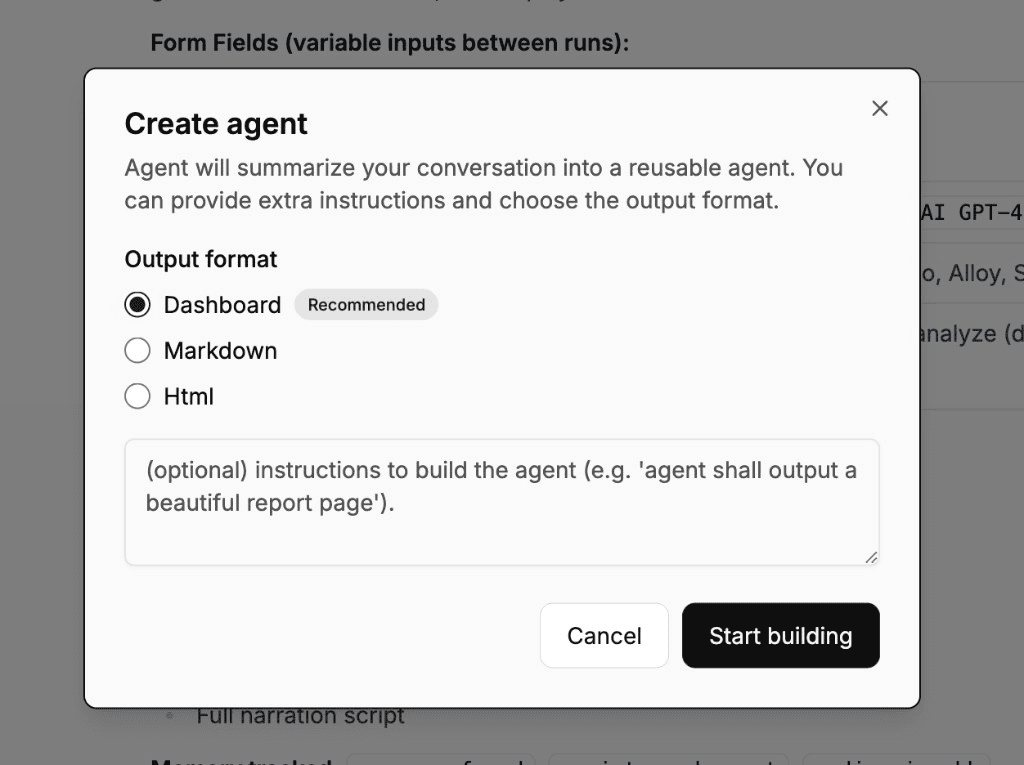
- Output format — choose from:
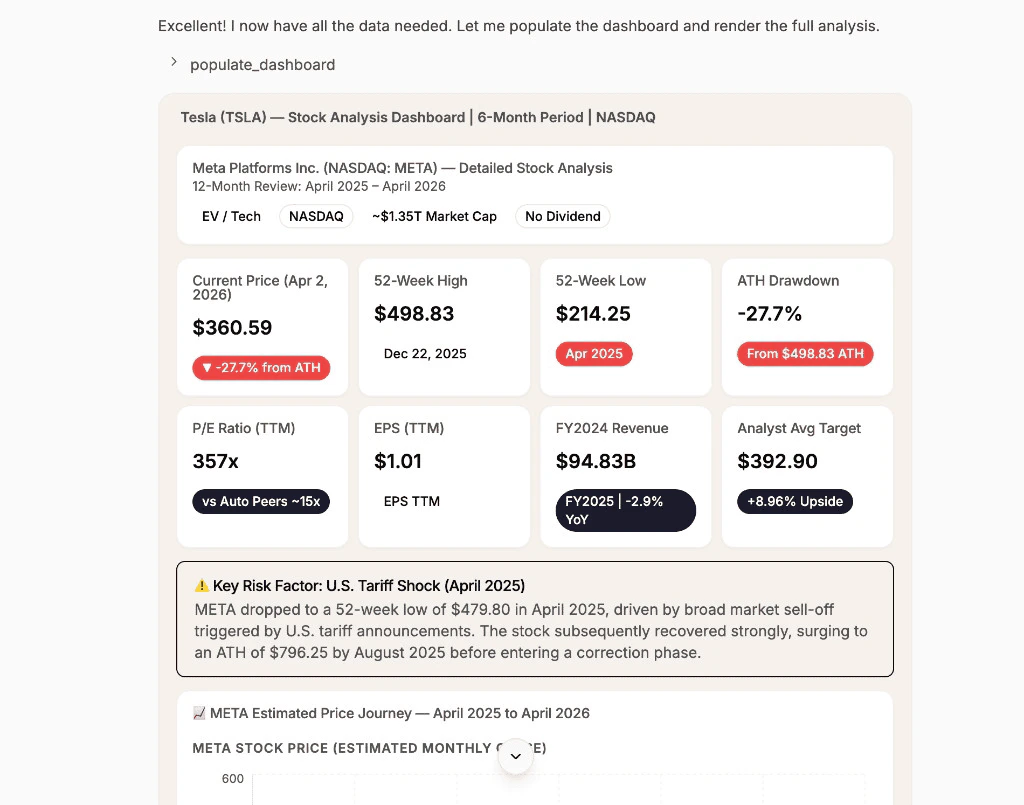
- Dashboard (recommended) — the agent renders a visual dashboard with KPI cards, charts, and tables inline in every session. A sample dashboard is generated during creation and reused as the layout template for future runs.
- Markdown — traditional text-based output saved as an artifact
- Html — interactive HTML page preview in the artifact panel
- Instructions — optional guidance for how the agent should execute (e.g., “focus on revenue growth metrics”)
The Agents page
The Agents page is your control surface for all your agents. Each agent card shows at-a-glance status that refreshes every 30 seconds:- Last run — whether the agent is currently running, and when it last ran with a success or failure indicator
- Next scheduled run — when the next automatic run is due (if a schedule is configured)

Running an agent
Open the Agents page from the sidebar and click an agent to run it. Each agent has:- Input form — structured fields (text, dropdowns, file uploads) that parameterize the run
- Run button — execute the agent with the provided inputs
- Session history — view previous runs and their outputs
Input forms
The super agent automatically generates input fields based on the original prompt. For example, if the original session was:| Field | Type | Default |
|---|---|---|
| Team name | Text | ”marketing” |
| Report type | Text | ”weekly” |
| Topic | Text | ”social media metrics” |
| Time period | Text | ”last week” |
Follow-up and refinement
After creating an agent, you can refine it by sending follow-up messages in the chat:Version control
Every modification to an agent creates a new version automatically. Each version captures the full agent configuration — input fields, output format, execution instructions, and attached files — so you always have a snapshot of what worked. You can:- View version history — see all versions with timestamps and who made the change
- Read release notes — the super agent summarizes what changed in each version so you can review before adopting
- Publish a version — mark a version as ready to distribute to your team or the community
- Restore a previous version — roll back if a refinement didn’t work out; restoring creates a new version so nothing is lost
- Download any version — export a specific version as a ZIP bundle for backup or transfer
- Pull source updates — when an upstream source agent publishes a new version, you can pull the latest changes into your copy
Version control is automatic. You never lose a working version when you iterate on an agent.

Exporting and importing
Agents can be exported as ZIP bundles and imported into other accounts. Imported agents preserve version history metadata.Agent detail page
Each agent has a detail page showing:Overview tab
- Title and description
- Created date and version count
- Quick-run form
Files tab
The Files tab is a file manager for reference files attached to the agent. These are supplementary resources — templates, datasets, images, configuration files — that the agent can read during every run.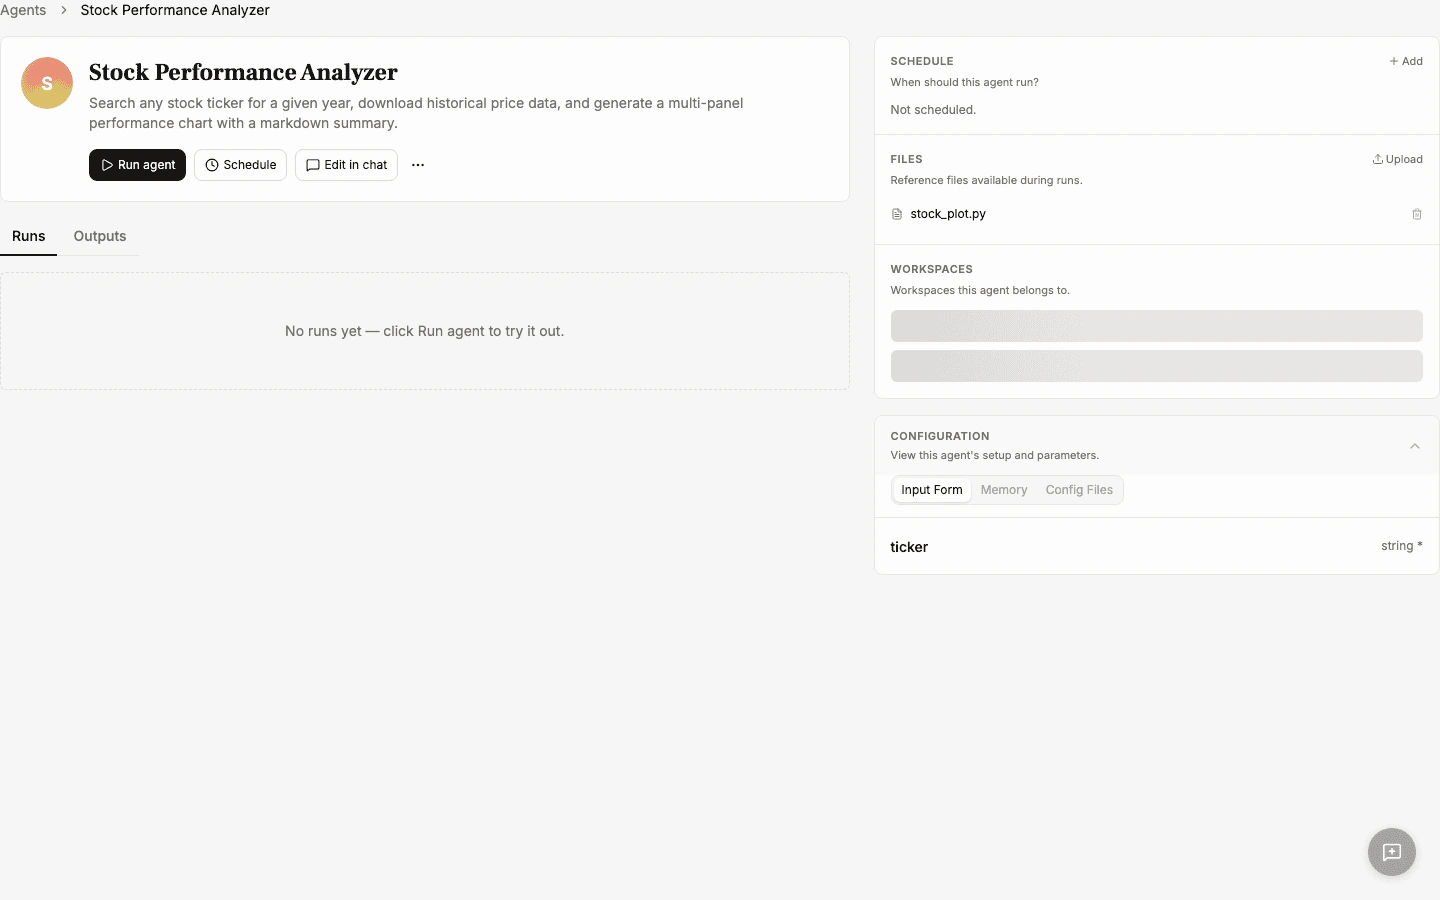
How files get attached
There are two ways files end up in an agent’s Files tab:- Automatic — when the super agent builds the agent, it can stage reference files during creation. For example, if the agent generates a report template or pulls in a dataset, those files are automatically attached to the agent.
- Manual upload — open the Files tab and drag-and-drop files or click to browse. You can upload multiple files at once (up to 10 MB each, 50 files per agent).
How the agent uses files
When the agent runs, all attached files are mounted into the sandbox at predictable paths. The agent receives a manifest (app-files.json) that maps each file’s display name to its sandbox path, so it can read the files directly during execution.
This is useful for workflows that need fixed reference material — for example:
- A report generator that uses a branded HTML template
- A data analyzer that reads a CSV dataset
- A content writer that follows a style guide document
Managing files
- Preview — click any file to open a preview overlay (images render inline; other types show content or download)
- Delete — click the trash icon next to any file to remove it permanently
- Upload more — the drag-and-drop area is always available at the bottom of the tab
Agent files are separate from the global Files page. They are scoped to a specific agent and mounted into the sandbox every time that agent runs.
Config tab
- The config.yaml that defines the agent’s input form, output format, and memory settings
- The skill.md that contains the agent’s execution instructions
Sessions tab
- History of all runs with inputs and outputs
- Status (success, error) and timestamps
- Links to the full chat thread for each run
- Dashboards — if the agent produced a visual dashboard during the run, it appears in the expanded session card alongside the summary and artifacts
Sharing agents
You can share any agent you have created via a direct install link. From the agent’s version history, click Share to copy the link to your clipboard. When someone opens the link, they see a preview page with:- The agent’s name, description, and avatar
- An Install button that copies the agent to their own account
Write autonomy and approvals (Beta)
This feature is currently in beta testing. If you’d like early access, contact us at support@creao.ai.
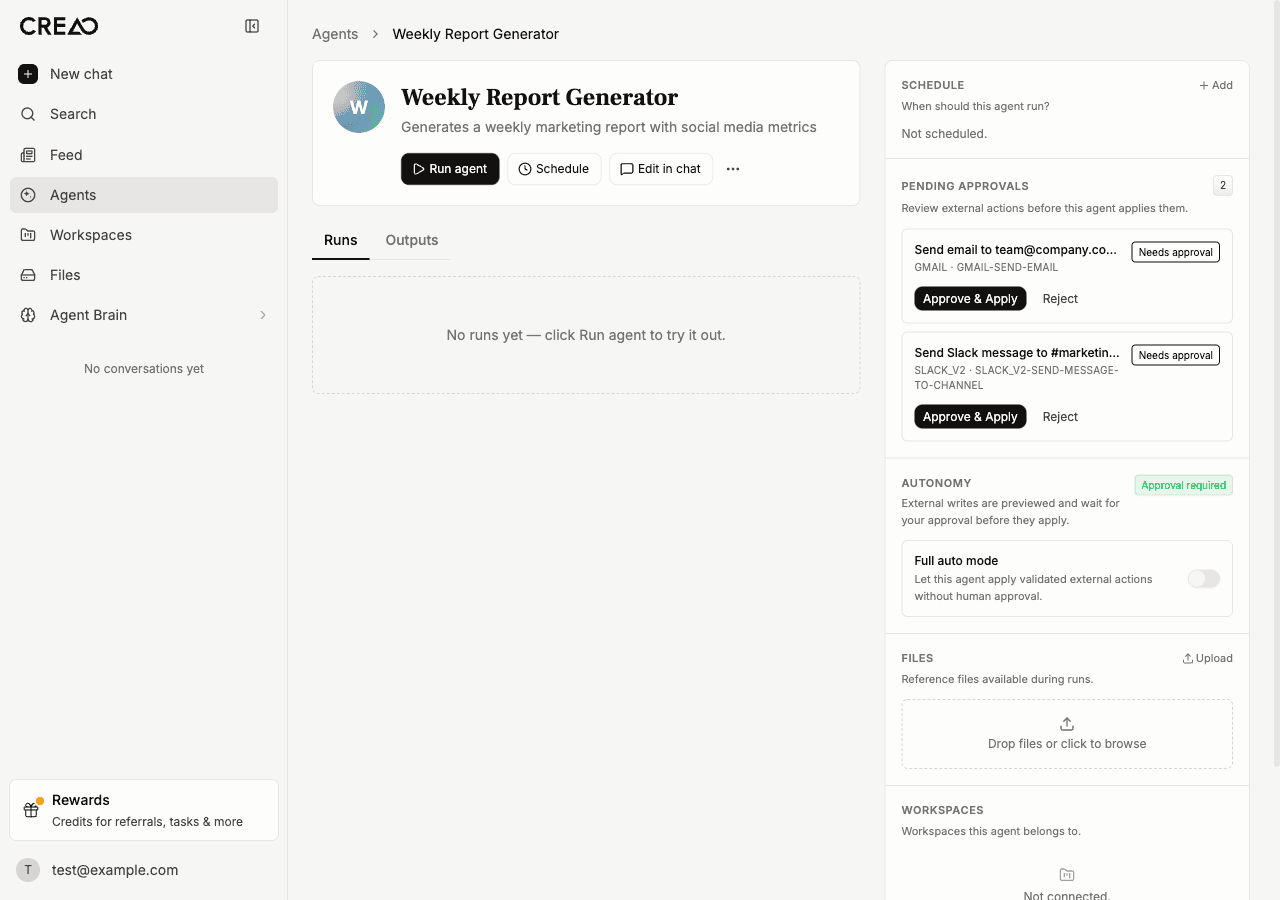
How it works
Every tool call the agent makes to a connected service is classified as read, write, or destructive:- Read — fetching data, listing items, searching. These always run immediately.
- Write — sending a message, creating a post, updating a profile. These require approval by default.
- Destructive — deleting content, archiving channels, ending campaigns. These are blocked if validation fails.
Autonomy modes
Each agent has an autonomy setting you can toggle from the sidebar:- Approval required (default)
- Full auto
When the agent wants to perform a write or destructive action, it pauses and shows an approval card in the chat. You can review the proposed action — including a preview of what will be sent — and either:
- Approve & Apply — the action executes immediately
- Reject — the action is cancelled and the agent is notified
Supported connectors
Write autonomy currently covers these connectors:| Connector | Write examples | Destructive examples |
|---|---|---|
| X (Twitter) | Post tweet, retweet, like | Delete tweet, unlike |
| Gmail | Send email, create draft | Delete email |
| Outlook | Send email, create contact | — |
| Slack | Send message, create channel | Delete message, archive channel |
| Discord | Send message | — |
| Telegram | Send message, forward message | Delete message |
| Submit post, submit comment | — | |
| YouTube | Upload video, create playlist | Delete playlist |
| Microsoft Teams | Send message, create channel | — |
| eBay | Create offer, publish listing | End campaign, delete campaign |